Sourdough bread with olives
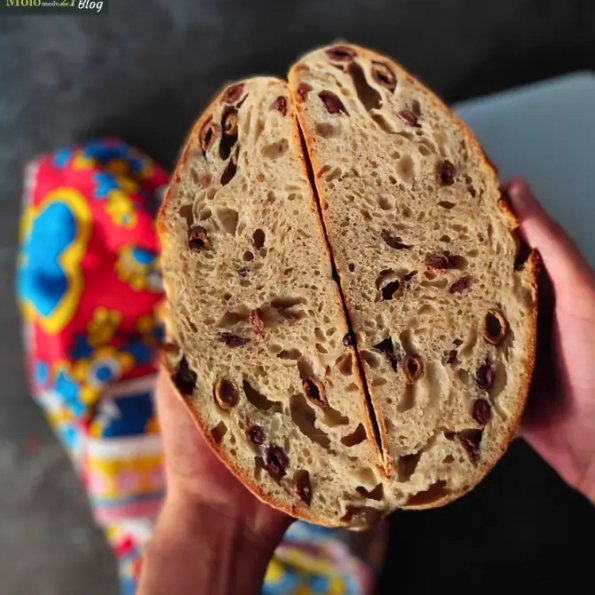
Find out how to make olive bread at home! This bread is great for making sandwiches, to eat with salads or main courses, but also as an appetiser with cheese and cold cuts or as an aperitif. Perfect to toast in the oven or in a frying pan with a drizzle of oil if you prefer a more focaccia-like result.
- 470 grams FLOUR
- 30 grams WHOLEMEAL FLOUR
- 110 grams SOURDOUGH STARTER
- 390 grams WATER
- 120 grams TAGGIASCA OLIVES (pitted)
- 1 tablespoon HONEY
- 10 grams SALT
- Start with the dough
Mix together in a large bowl all the flour and the active sourdough starter, dissolved in 380 grams of lukewarm water, plus a tablespoon of honey. We knead, trying to avoid lumps. It does not have to be smooth, but it should be quite 'rough'. Cover with a cloth and leave to rest for twenty minutes.
- Add salt
We add salt, spreading it on the surface. With sprays of water, we dissolve the salt and knead until all the remaining water has been absorbed. To ensure that the dough does not become too stretched, it is recommended to alternate phases of kneading and adding water with resting phases. Do not add all the water at once. The dough should start to become elastic and smooth. When we have run out of water, let it rest for half an hour.
- Now it is time for the olives
 After half an hour has passed, the pitted olives are added. To prevent olives from causing problems with the dough, because they are greasy, it will be necessary to drain them well from their oil and allow them to dry. Prepare them first. The olives will have to be at room temperature.
To add the olives, we take about a third of them and put them in the bowl on top of the dough. Then we need to moisten our hands and with our fingers gently lift the farthest flap of dough and bring it towards us from above so that it covers part of the olives. Repeat the operation on the remaining three sides until the olives are covered. Now add another third of the olives and repeat the same process, and so on with the remaining olives. Always keep your fingers moist.
After half an hour has passed, the pitted olives are added. To prevent olives from causing problems with the dough, because they are greasy, it will be necessary to drain them well from their oil and allow them to dry. Prepare them first. The olives will have to be at room temperature.
To add the olives, we take about a third of them and put them in the bowl on top of the dough. Then we need to moisten our hands and with our fingers gently lift the farthest flap of dough and bring it towards us from above so that it covers part of the olives. Repeat the operation on the remaining three sides until the olives are covered. Now add another third of the olives and repeat the same process, and so on with the remaining olives. Always keep your fingers moist. - Bowl foldsImmediately after we have added the olives, we check the state of the dough and make some folds to make it smoother. Since the dough is quite hydrated, it is recommended to use the coil folding method. Basically it is similar to what we did to add the olives but in reverse, i.e. instead of lifting the flap and bringing it towards us from above, in the coil fold we start from under the dough (in the centre) and pull it up and towards us. Basically, the dough folds in on itself each time. Repeat on all four sides with wet hands. These folds must be repeated 2 more times (in addition to the first one at the same time as the olives are added) at an interval of 45 minutes. Then leave to rise for a further hour. The rising times are influenced by the temperature, so usually in summer it is faster while in winter it will take longer.
- End of first rising

When we see that the dough is slightly rounded at the edges and that bubbles begin to form on the surface, this means that the first rising is complete. We flour our pastry board and gently tip the dough onto it. Using a bowl scrape we give the dough its first shape; dust with flour and leave it to rest for half an hour under a cloth, or the bowl itself. After half an hour, give the bread its final shape and then place it in the leavening basket (dusted with flour) covered with a cloth.
Place the basket with the bread in the least cold part of the fridge and let it finish rising for 18 hours.
- We are ready to bake
It is almost past 18 hours, so it is time to turn on the oven. A static oven is recommended for baking bread. For a better end result, many prefer to bake bread on a baking stone or in a dutch oven. However, the bread will be good even if you use basic tools!
Bring the oven to 250°C. When it is at temperature, put a small bowl with water in it to make steam. Take the bread from the fridge and gently turn the basket upside down onto a sheet of baking paper. Use a razor blade to make a longitudinal cut on the surface of the bread. Bake the bread. Let it bake for 15 minutes then take the bread out to make a cut in the same place again. Lower the temperature to 230°C. After 15 minutes lower the temperature further to 180°C and bake for another quarter of an hour until the bread has formed a golden, crispy crust. Leave to cool on a wire rack for a few hours.